...
| Note |
|---|
The minimum computer specification for installing the DataSHIELD training environment is:
|
Installing the Virtual Servers
Install VirtualBox
To run the virtual servers you will need to install VirtualBox (click here for more about what Virtualbox is).
...
| Code Block | ||
|---|---|---|
| ||
$ sudo apt-get install virtualbox |
Download the Virtual Servers
Two virtual servers are available for you to test DataSHIELD with. The virtual servers require 4GB RAM each and about 5GB hard-disk space each.
You can download the VMs from google drive:
...
| Panel | ||||
|---|---|---|---|---|
| ||||
Import the Virtual Servers into VirtualBox
You will need to import the VMs into Virtualbox. Open Virtualbox, and in the top menu, on the left:
File > Import Appliance...- Navigate to the directory the VM files were saved to (e.g. Downloads...)
- Click "Next", to move onto "Appliance Settings"
- Nothing needs to be changed here, so click "Import"
- the import should take around 1 minute
- Repeat for the second downloaded VM file.
Setting up the Virtual Servers
Setting up the VirtualBox network adapter
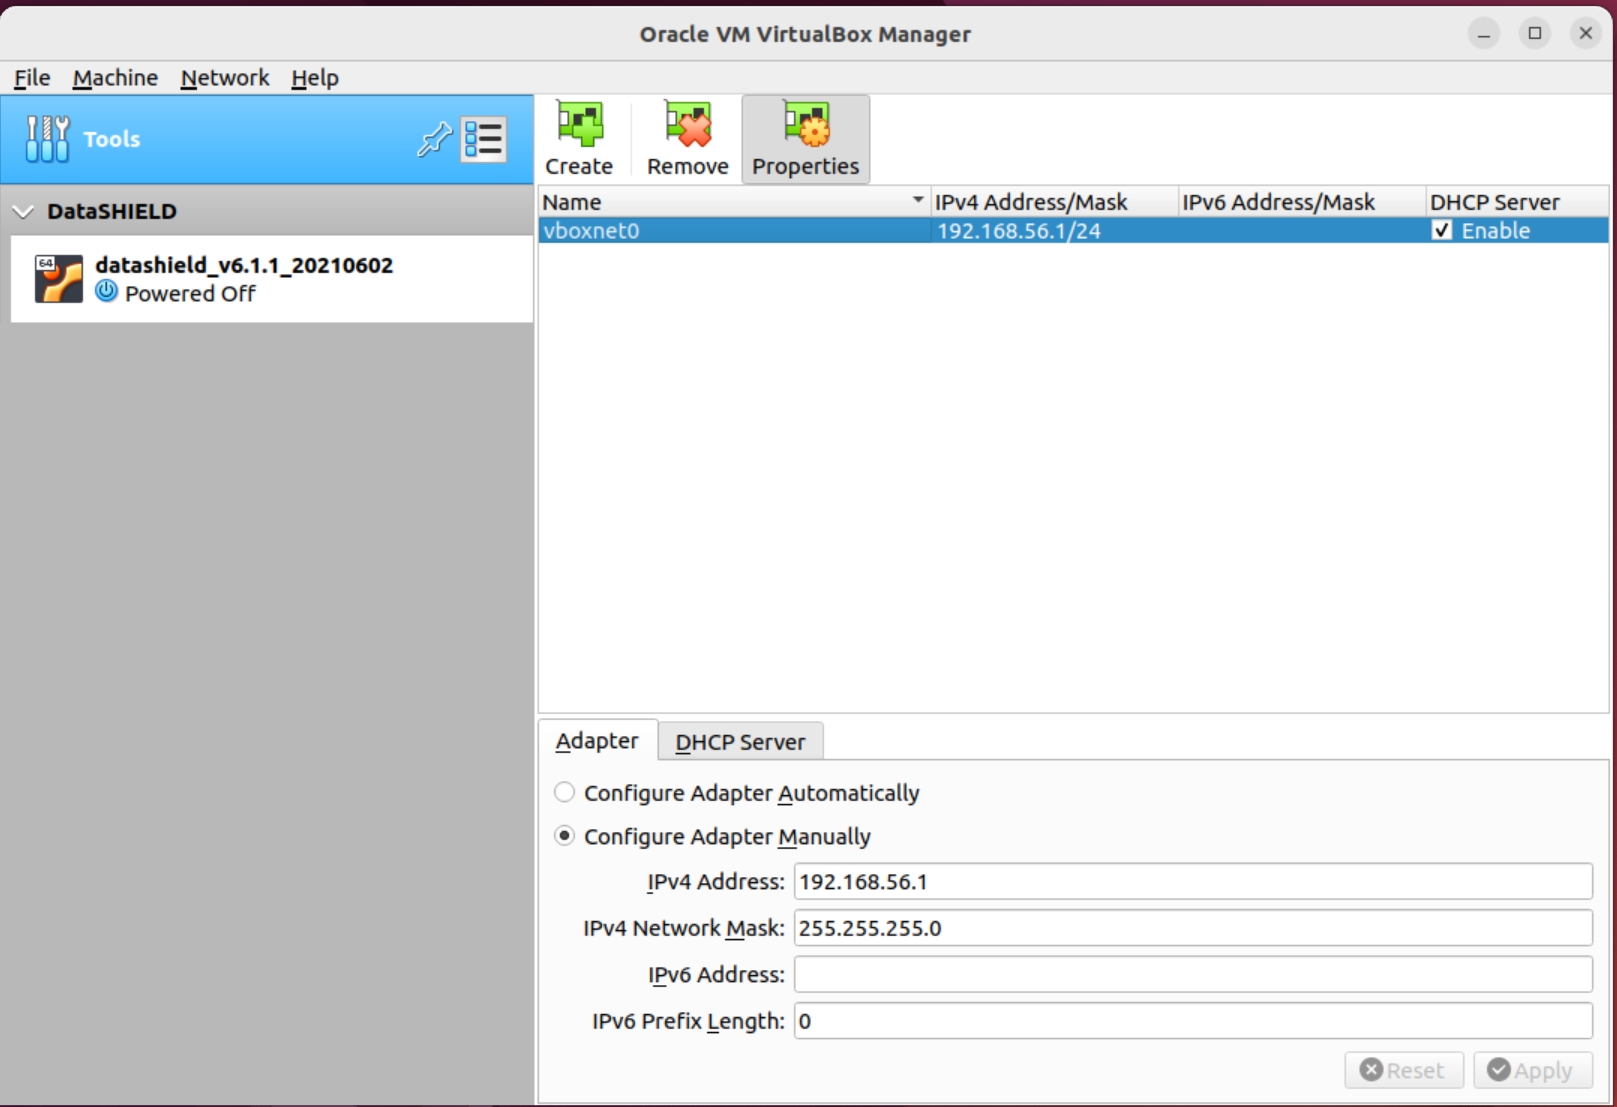
- On the VirtualBox "Tools" bar at the top of the list of Virtual Machines on the left hand side, right left click and select Host Network manager. A popup window should appear. Network and click Create
- Ensure the Adapter
tab at the bottom of the screen has the following settings:- Configure Adapter Manually options checked
- IPv4 address: 192.168.56.1
- IPv4 Network Mask: 255.255.255.0
- IPv6 Prefix Length: 0
- And ensure the DHCP Server tab at the bottom of the screen, next to Adapter;
- Has Enable Server unchecked.
- Click "Apply" to save any changed settings.
- You can now safely close this Host Network Manager popup window
- Now on each of your imported Virtual Machines, one at a time, right click the VM and click on "Settings" at the top of the right click menu (icon is orange in colour):
- Check that under the Network tab on the left hand side, the following options are set:
- Adapter 1: Attached to: NAT
- Adapter 2: Attached to: Host-only Adapter
- Name: 'vboxnet0'
- Check that under the Network tab on the left hand side, the following options are set:
Connect to the Virtual Servers
Boot the Virtual Machines
Now that the two virtual machines have been downloaded, imported and configured, it's time to launch them. What is happening when the VM launches is that it is booting up a mini-computer (within your computer) which plays the role of an Opal server as if it were online and you were remotely connecting to the data stored on it.
...
Now that your VMs are launched you should check they are ready to be used before getting set up in R.
Virtual Servers' IP addresses
By default, machines on the host-only network can be found at 192.168.56.xxx:
...
- dstesting-100 – 192.168.56.100
- dstesting-101 – 192.168.56.101
Web Access to the Opal Server (How to look inside the VM)
The opal web interface is accessed in you browser. Simply type the IP address of the VM, followed by the port number.
...
| Info | |||||
|---|---|---|---|---|---|
| |||||
The following username and password is used to access the web portal of the training servers:
e.g. to read about the metadata of the studies, or to connect to external resources. |
When finished: Shutting down the Opal servers
Assuming no changes have been applied to the Virtual Opal Servers (which will be the case for general users) after you have finished your analysis, to shutdown the Opal server:
- click the cross at the top right of the window. This will give you a list of options for how to shutdown the machine:

Choose: Send the shutdown signal.
Note Turing off a VM "abruptly" can cause problems, so please follow the specific shutdown instructions.
Setting up your R Session
| Note |
|---|
These are instructions for installing R on your own machine. That is, the machine you will be using for analysis, not the virtual servers. These instructions assume you are using Ubuntu on your local machine. |
Installing R in Ubuntu
| Note |
|---|
Note: the CRAN R repository you add depends on the Ubuntu release you are running: |
...
And take note of the number (20, 18, 16) next to "Release".
Now install R using the following instructions:
- If you are running Ubuntu 20.04 "Focal Fossa":
- Open this link in a NEW TAB (right click → new tab, or middle mouse click) https://www.digitalocean.com/community/tutorials/how-to-install-r-on-ubuntu-20-04
- If you are running Ubuntu 18.04 "Bionic Beaver":
- Open this link in a NEW TAB (right click → new tab, or middle mouse click) https://www.digitalocean.com/community/tutorials/how-to-install-r-on-ubuntu-18-04
- If you are running Ubuntu 16.04 "Xenial Xerus":
- Open this link in a NEW TAB (right click → new tab, or middle mouse click) https://www.digitalocean.com/community/tutorials/how-to-install-r-on-ubuntu-16-04-2
Set-up R for DataSHIELD analysis
Install the Opal packages
Open an R Session (whether in terminal, RGui or RStudio), then run:
| Code Block | ||
|---|---|---|
| ||
R
install.packages('DSI')
install.packages('DSOpal')
install.packages('DSLite')

install.packages(c('fields', 'metafor', 'ggplot2', 'gridExtra', 'data.table')) |
Install the DataSHIELD client packages
| Code Block | ||
|---|---|---|
| ||
install.packages('dsBaseClient', repos=c(getOption('repos'), 'http://cran.obiba.org'), dependencies=TRUE)
|
...
| Note |
|---|
Although be aware that this will place the DataSHIELD packages wherever your R libraries are saved. This may be unhelpful for development- in which case you may have to relocate your files. |
DataSHIELD R Package Manuals
See: Current release
Keeping up to date
Please see our keeping up to date wiki page in the user/analyst support section.
What's next?
| Tip |
|---|
You are now fully set up. To start using the DataSHIELD test environment, you can try our Tutorial for DataSHIELD users. The tutorial teaches you the basics of DataSHIELD including how to:
|
...