v6.0 Linux Installation Instructions
- Alex Westerberg (Unlicensed)
Help
DataSHIELD support is freely available in the DataSHIELD forum by the DataSHIELD community. Please use this as the first port of call for any problems you may be having, it is monitored closely for new threads.
The minimum computer specification for installing the DataSHIELD training environment is:
- Ideally 12GB+ of RAM. Each VM is allocated 4GB RAM, and some needs to be spare for other applications.
- Reasonably powerful processor (for example: Intel i5 or i7).
- 16GB space on the hard disk.
- 7GB per VM + VirtualBox installation requirement (80 MB)
Installing the Virtual Servers
Install VirtualBox
To run the virtual servers you will need to install VirtualBox.
On Ubuntu, type in the Ubuntu Software store "VirtualBox" or in the terminal:
~$ sudo apt-get install virtualbox
Download the Virtual Servers
Two virtual servers are available for you to test DataSHIELD with. The virtual servers require 4GB RAM each and about 5GB hard-disk space each.
You can download the VMs from google drive:
Import the Virtual Servers into VirtualBox
You will need to import the VMs into Virtualbox. Open Virtualbox:
File > Import Appliance...
Setting up the Virtual Servers
Setting up the VirtualBox network adapter
- On the VirtualBox top menu, at the far right, go to the tab Global Tools, click the drop down and select Host Network manager.
- Ensure the Adapter
- IPv4 address: 192.168.56.1
- IPv4 Network Mask: 255.255.255.0
- IPv6 Prefix Length: 0
- And ensure the DHCP Server tab, next to Adapter, at the bottom of the screen:
- Has Enable Server unchecked.
- Click "Apply" to save any changed settings.
- Ensure the Adapter
- Now click on Machine Tools at the top of the screen, next to "Global Tools", and select from drop down Details.
- Selecting each VM in turn, check that under the Network tab, the following options are fulfilled:
- Adapter 1: Intel PRO/1000 MT Desktop (NAT)
- Adapter 2: Intel PRO/1000MT Desktop (Host-only Adapter, 'vboxnet0')
- Selecting each VM in turn, check that under the Network tab, the following options are fulfilled:
See here for more information on virtualbox networking (if a network warning occurs, or you are having trouble connecting to the VM).
Once the machines have been started you can login directly, for tasks such as reviewing logs produced on the server, instructions here.
Connect to the Virtual Servers
Starting the Opal test servers
To start an Opal server just open VirtualBox click on a server and click on the green arrow that says start
(or just double click on the Opal server name).
Depending on how powerful your computer is, the Opal servers may take a few minutes to boot and for Opal to start.
Be aware, once the VM windows have started, clicking inside them can cause your mouse pointer to become captured. The default key to escape this is Right-Ctrl
Virtual Servers' IP addresses
By default, machines on the host-only network can be found at 192.168.56.xxx:
Your computer (the host) will be at 192.168.56.1
The virtual servers have been configured as follows:
- dstesting-100 – 192.168.56.100
- dstesting-101 – 192.168.56.101
Should you wish to create more servers, see here
Opal web access
The opal web interface is accessed in you browser. Simply type the IP address of the VM, followed by the port number.
For example: to access the web interface for dstesting-100, go to:
- http://192.168.56.100:8080 for the non-secure connection
- https://192.168.56.100:8443 for the secured connection
Note: You will get a warning when connecting to 8443 because the SSL certificate is self-signed.
Please allow up to 2 minutes after launching a VM to gain access to the Opal web interface.
Logging onto the Opal web interface
The following username and password is used to access the web portal:
username: administrator
password: datashield_test&
e.g. to upload your own data.
Shutting down the Opal servers
If no changes to Opal servers (e.g. for general users), when you have finished your analysis, to shutdown the Opal server:
- click the cross at the top right of the window. This will give you a list of options for how to shutdown the machine:
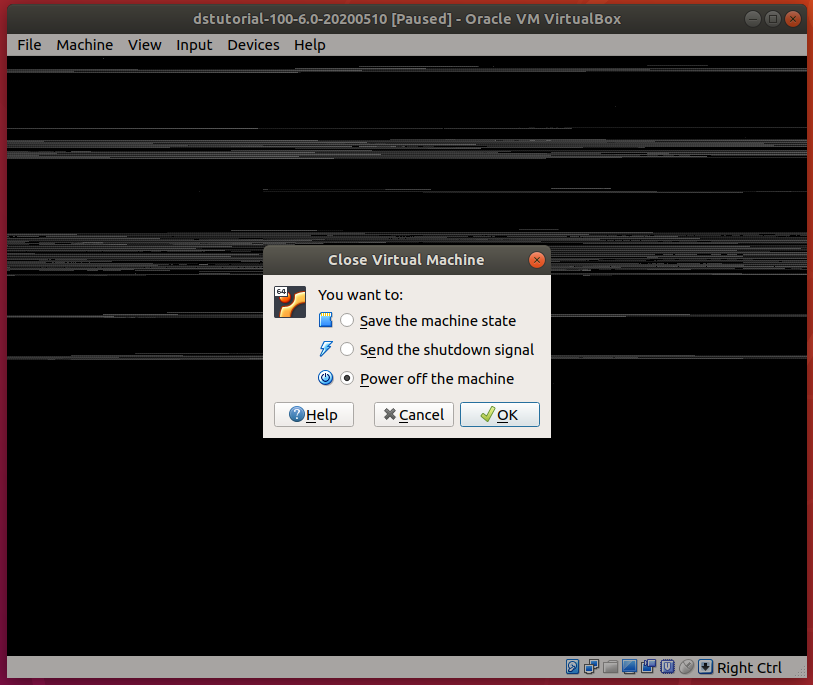
Select Power off the machine.
Turing off a VM "abruptly" can cause problems, hence the specific shutdown instructions.
Setting up your local machine to use the VMs
These are instructions for installing R on your own machine. That is, the machine you will be using for analysis, not the virtual servers.
These instructions assume you are using Ubuntu on your local machine.
Installing R in Ubuntu
Use:
$ sudo -i
to run the following commands as root.
Add a CRAN R repository
Add the following to the /etc/apt/sources.list file, this gives a newer version of R than the one that is in Ubuntu's repositories. Note: the CRAN R repository you add depends on the Ubuntu release you are running:
- If you are running Ubuntu 18.04 "Bionic Beaver":
# add-apt-repository 'deb https://cloud.r-project.org/bin/linux/ubuntu bionic-cran35/'
- If you are running Ubuntu 16.04 "Xenial Xerus":
# add-apt-repository 'deb https://cloud.r-project.org/bin/linux/ubuntu xenial-cran35/'
You may wish to select a different CRAN mirror, closer to your location.
You can find further details about installing R in Ubuntu on the CRAN website.
Add the public key for the CRAN R repository to your list of keys
# apt-key adv --keyserver keyserver.ubuntu.com --recv-keys E298A3A825C0D65DFD57CBB651716619E084DAB9
Install R
(Plus one dependency, needed for installing R packages)
- "apt-get install r-base" will install the latest version of R
# apt-get update
# apt-get install r-base r-base-dev libcurl4-openssl-dev
Additional libraries for DataSHIELD development
Should users wish to do development on DataSHIELD, the following libraries will need to be installed
# apt-get install libxml2-utils
# apt-get install libxml2-dev
# apt-get install libssl-dev
# apt-get install libgit2-dev
Set-up R for DataSHIELD analysis
You shouldn't do this as root, instead run command:
# exit
or use the ctrl + D hotkey combination.
Install the Opal packages
Do this either in R environment of terminal (see below), or by getting the RStudio app through the ubuntu application store, then running the below commands prefixed with ">" in the terminal.
$ R
> install.packages('DSI')
> install.packages('DSOpal')
> install.packages('DSLite')
Install the DataSHIELD client packages
> install.packages('dsBaseClient', repos=c(getOption('repos'), 'http://cran.obiba.org'), dependencies=TRUE)
Although be aware that this will place the DataSHIELD packages wherever your R libraries are saved. This may be unhelpful for development- in which case you may have to relocate your files.
To exit the R environment within terminal, use
> q()
DataSHIELD R Package Manuals
See: Current release
Keeping up to date
If you have installed the DataSHIELD client packages using the method above (that is, within R using install.packages and specifying the Obiba repository), then you can update those client packages as follows:
# R
> update.packages(repos='http://cran.obiba.org')
You are now fully set up. To start using the DataSHIELD test environment, you can try our Tutorial for DataSHIELD users. The tutorial teaches you the basics of DataSHIELD including how to:
- login
- run commands to:
- generate descriptive statistics
- subset tables and vectors
- fit some regression models
Further instructions are available for the advanced users of the DataSHIELD test environment:
- Follow the instructions in the Opal management tutorial to learn how to upload your own data.
- DataSHIELD R package manuals will be available soon on the release notes page.
- Install non-CRAN R packages to the training Opal servers (coming soon)

DataSHIELD Wiki by DataSHIELD is licensed under a Creative Commons Attribution-ShareAlike 4.0 International License. Based on a work at http://www.datashield.ac.uk/wiki